A Menu Reference
This chapter gives a complete description of all the menus available within Ozcar.
A.1 The Main Menu
The main menu is located on the top of Ozcar's main window.
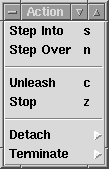
A.1.2 Action

Do exactly one step (stop again at the next step point, enter procedures). Identical to pressing the
 button.
 Do one step, not stopping on nested constructs which constitute a step point. Identical to pressing the
 button.
 Continue execution until the selected stack frame is about to be popped from the stack, or until the stack is empty if no frame is selected. Identical to pressing the
 button.
 Stop the selected thread at the next step point it reaches, or immediately if it is blocked. Identical to pressing the
 button.
|
|
|
|
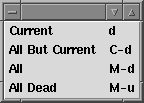
Detach
This menu contains some useful entries to detach one or more attached threads.

Detach the selected thread. Identical to pressing the
 button.
 Leave the current thread alone in the thread forest. Detach all others, letting them run freely (unless dead).
Detach all threads, letting them run freely (unless dead).
Detach all dead threads.
|
|
|
|
Terminate
This menu contains some useful entries to detach and kill one or more attached threads.

Detach and kill the current thread. Identical to pressing the
 button.
 Leave the current thread alone in the thread forest. Detach and kill all others.
Detach and kill all threads.
|
|
|
A.1.3 Thread

Select the thread which is located above the selected thread in the thread forest. If the selected thread is the topmost thread in the forest, the bottommost thread is selected.
Select the thread which is located below the selected thread in the thread forest. If the selected thread is the bottommost thread in the forest, the topmost thread is selected.
Print some useful information about the currently attached threads, for example:
2 attached threads, currently selected: 58/1 (stopped, runnable). The two numbers associated with the selected thread are the thread ID and the parent's thread ID. In parentheses, the thread's state is given.
|
|
|
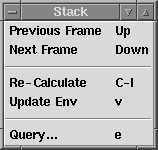
A.1.4 Stack

Select the previous stack frame (if it exists) of the selected thread. Note that the stack grows downwards, so you will reach an older frame.
Select the next stack frame (if it exists) of the selected thread; you will reach a younger frame.
Update the Stack View. You may see internal stack frames appear, as well updated values in the Environment Views. (There is no automatic update to display a value as soon as it changes.)
Immediately recalculates and redisplays the environment of the selected stack frame.
Opens a dialog box where statements can be executed or expressions evaluated in the context of the currently selected stack frame's environment. If the computation does not terminate, use the Reset button to cancel the operation and kill the computation.
|
|
|
|
|
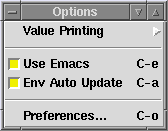
A.1.5 Options

If turned off Emacs is not used as a Source View, so you don't get any source position information.
If you debug threads with huge environments, it may be a good idea to turn of the automatic update of the environment (recalculation and redisplay every time you make a step) in order to save time and memory. When the variables display is not up to date, it will be displayed in gray. You can always request the current environment by pressing v (see above, item
Update Env).Opens a dialog box to adjust preferences. For instance, many events are handled in batch mode if they arrive in quick succession. The
Idle Time To Perform Actionpreferences define what a ``quick succession'' is. You can also adjust the width and depth to which values are displayed in the Stack and Environment Views (ifValue Printingis set toComplete). Furthermore, the display of ``system variables'' can be suppressed in the Environment Views (system variables are variables starting with a backquote - they are used by the compiler for built-in runtime operations). Application of the primitive procedures.(feature selection) andNewNamecan be ignored for purposes of stepping. Last but not least some logging of the workings of Ozcar can be printed to standard output - should you ever want to report a bug in the debugger itself, you should try to include this information in your report.
|
|
|
Value Printing
In this menu you can determine how to display values in the Stack and Environment Views. There is the short form which only prints type information for most values, and a long form which always prints the actual value (up to a given print width and depth, which can be set in the Preferences dialog box, see below).

This is the default setting. You just see type information, which leads to a very compact display style.
You see the actual value, using the function
Value.toVirtualString. This display mode can be quite unhandy if the values to be printed are large tuples or records. You should carefully adjust the print depth and print width to your needs.
|
|
A.2 SubThreads
This menu is located to the right of the button bar, below the menu bar. You can select how child threads of already attached threads should be treated.
Children will not be attached at all, but run freely.
Children will be attached and immediately stopped. This is the default.
Children will be attached and the command
Unleash 0be executed. This gives you a good feeling about how threads are created in a concurrent application. They will terminate normally (unless they block somewhere), but will still be included in the thread view.Children will be attached and the command
Unleash 1be executed. This makes it possible to explore the environment of every child thread just before it terminates.
|
|
|
|
A.3 Queries
This menu is located to the right of the button bar, next to the SubThreads menu. You can select how threads created by the OPI are treated by Ozcar.
OPI threads are not attached, neither are any of their subthreads (unless, of course, they run into a breakpoint).
OPI threads are attached and immediately stopped. This is the default.
|
|
